ForeFlight Mobile tip: how to use the flight planning Advisors
The ForeFlight Mobile app aims to be your one-stop shop during the flight planning process, allowing you review weather, charts, NOTAMs, TFRs and airport information in a convenient, organized fashion. ForeFlight recently enhanced this capability by adding three new Advisors with helpful features that make flight planning and decision making simpler. Route Advisor, Procedure Advisor, and Altitude Advisor all work together to save you time and optimize your flight plan based on real-time weather conditions and anticipated ATC routing for IFR flights. You’ll find these features in ForeFlight Mobile version 4.6 and newer.
First set up your aircraft profile
To save time and get the most out of ForeFlight’s Advisor features we recommend that you first set up an aircraft profile. To do this, go the ‘More’ tab at the bottom right, and select Aircraft from the list of options on the left side of the screen. Here you can set up new aircraft and specify which N# to use as a default if you fly multiple aircraft. To add a new profile, press the ‘+’ symbol at the top right of the screen. Now tap in the first field to enter the tail number, and proceed down the list entering each piece of required data. When finished, press the ‘Done’ button at the top right of the window to save the profile. If you entered multiple aircraft, tap the one you want to use as the default aircraft during flight planning, and you’ll see a small checkmark at the right confirming the selection. Not only will this save you time when using the new Advisors flight planning feature, but it will also auto-fill most of the required aircraft and pilot data when using the File & Brief function.
Route Advisor
Now head over to the Maps section of the app to start planning the flight. Start by entering the departure and destination airports. While you can still use the white route search box at the top right of the screen, you may find it easier to add waypoints with the Route Editor. To access this, press the NavLog overlay button at the top of the screen (third from the left, icon with 3 horizontal lines). Tap anywhere in the blank box, and the keyboard will slide up to allow typing. After entering the departure airport identifier, press the space bar and enter the destination airport ID, and then press the ‘return’ button on the keyboard. This sets up a direct flight plan between your selected airports and shows the direct route on the map. Next enter your estimated time of departure with the ETD button in the lower right corner.
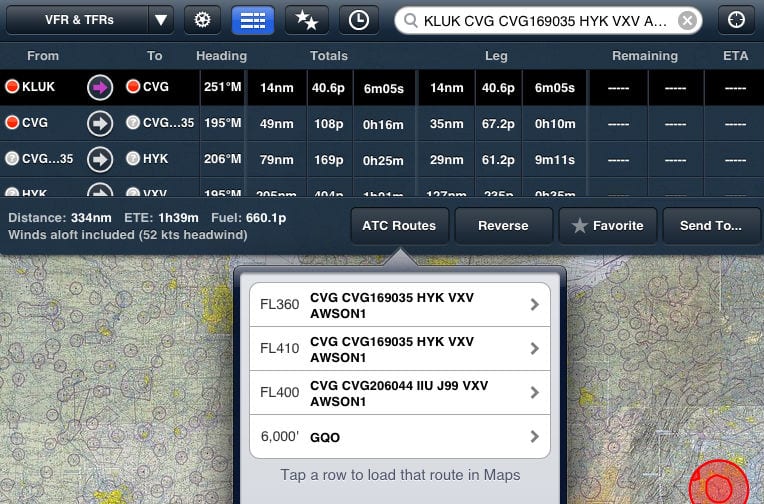
When flying IFR in congested airspace you will rarely get a clearance from ATC to fly direct. The new Route Advisor helps you plan ahead by showing recently cleared ATC routes and altitudes between your specified airports. Tap the Routes button at the right side of the box, and select one of the routes to automatically add the waypoints to your flight plan. You’ll also see options to load routing based on Victor Airways and ATC Preferred Routes if available (the same ones listed in the back of the A/FD). Now is also a good time to take advantage of one of ForeFlight’s powerful features by displaying the radar imagery & TFRs directly over the VFR/IFR chart and routing. You’ll quickly see if any last route changes are necessary to avoid potential weather hazards or restricted airspace.
Procedure Advisor
Need to enter an Arrival or Departure procedure into your flight plan? The new Procedure advisor makes this a snap, and no longer requires you to enter the procedure code into the route search box. Simply press the Procedure button at the right side of the route editor and select the departure or arrival airport in the pop-up window. Next select the procedure you want to load and finish by confirming which transition you would like. This will load the entire SID or STAR directly into your flight plan, including every VOR, intersection and waypoint. To see the full listing of all the waypoints, press the NavLog button at the bottom right of the route edit box. To remove the procedure, go back to the Edit view by tapping that button at the bottom of the box, tap the green procedure code, and tap the red Delete button.
Altitude Advisor
The last step of the flight planning process with ForeFlight is to choose an altitude. At the top left of the Route Editor window you’ll see your default aircraft N# (if you entered one), along with that aircraft’s true airspeed, fuel burn and altitude. You can change either the airspeed or fuel burn at any time by tapping the respective button and entering a new value in the pop-up window. Tapping the altitude value will bring up the Altitude Advisor window, showing estimated headwind/tailwinds, time en route and fuel burn at each altitude. Use the VFR/IFR and Westerly/Easterly buttons at the bottom to display the correct altitudes for your flight. Tap on your optimum altitude, press Done, and you’ll now find estimated planning numbers for your flight at the bottom left of the Route Edit box, including trip distance, fuel burn, time en route and total tailwind or headwind. To see a detailed NavLog press that button at the bottom right of the box.
To see an actual demonstration on how to use the new advisors in the ForeFlight app, check out our Advanced iPad Webinar video recording.
- iOS Update Green Light program: iOS and iPadOS 26.3 - February 12, 2026
- ForeFlight vs. Garmin Pilot: key differences to help you decide - February 10, 2026
- How to find your iPad model number - February 3, 2026


It would be helpful if there were a search engine for a stored, favorite route
Although ForeFlight is an exceptional program to use for flight planning and pilot information, there is one downfall that you will stumble across should you try to file from a airport that is close to the international border! The file portion of the program does not allow you to file from a Gateway airport that may underlie Canadian controlled airspace even though the airport is in the US. KDRM lies on the easternmost portion of Michigan’s Upper Peninsula but is under Toronto Center jurisdiction as far as airspace goes! ForeFlight does not allow you to file IFR from that airport to anywhere!
You may have to have the Canadian subscription. We have it, but have never flown out of an airport that falls into the category mentioned above.
Is there a tutorial I can use free
Great additions. They need to add a way to enter a holding delay and terminal delay. That would help during instrument training.
Foreflight has issues with ICAO flight plans. I filed IFR from DLH to CYKZ in Canada and it worked, but from CYKZ to KHPN it would n to take it! Very strange. So, i just use Fltplan.com which works to/from Int’l destinations …
I have been a subscriber for two years and Foreflight just keeps getting better and better.
When given the choices of SIDs and STARs it would be helpful if they could be listed in order of the most direct given route of flight.
Re Altitude Advisor described above. I’d like to know on what basis the winds are calculated. Since there’s only one wind result given for the entire flight, suppose you have a three hour flight. Given that you remain at one altitude, you can be sure that the winds would change as you progress on your flight. So do those winds, say, apply only to the first or initial portion of your flight? If so, would that result be based on distance or time? If not, are the winds as shown an average for the entire flight? I can’t find that anywhere in the ForeFlight docs.
Dan, the ForeFlight Mobile pilot’s guide says that the winds aloft reported at the various altitudes are a net average for any given route.
Have foreflight on my 10inch IPad, purchased IPad mini , how do I had the foreflight to the mini ,
thank you for the article I picked up some chips I didn’t know.
my only complaint about foreflight is that it always calculates flight time based on cruise speed beginning to end not adjusting for slower climb and descent speeds. I still have to use fltplan.com to get an accurate estimate of time enroute.
How do I remove headwinds from the calculation when flight planning? Sometimes I just want to look at a flight I might take weeks from and having the headwinds auto calculated is of no help? Any ideas
If set the cruising altitude to, say, 80,000 as there are no winds reported that high. That’s how I’ve gotten around it in the past. Fortunately it doesn’t calculate time to climb to that altitude. 🙂
I have version 4.8.1, but I can’t get access to Route Advisor. As one of the steps, the article says to “…enter your estimated time of departure with the ETD button in the lower right corner.” But my screen does not show a ETK button. Help Please!