5 tips for planning a flight with Garmin Pilot
Today’s aviation apps are so capable that it can be easy to fall in the habit of using only their core features, like checking METARs on the ground, viewing the moving map sectional in the air, or reviewing digital instrument approach procedures before landing. Heck, if that’s all these apps offered, most pilots would still be pretty happy with the investment in the iPad and an annual subscription to the app.
The reality is these apps can do so much more, and it’s worth taking the time to sit down on a rainy day (or during quarantine) and explore their hidden features. It’ll help you break out of your iPad routine and improve your preflight planning and in-flight situational awareness. To get you started, here are 5 lesser-known features in the Garmin Pilot app to check out before the next flight.
1) Icing forecast: severity or probability?
When viewing the main map screen on the ground before a flight, tap the settings button in the lower left corner to view weather and overlay options. Select Icing (Internet) from the list of options on the far right. The catch here is that there is another submenu option on the bottom right of the map to select the type of icing forecast displayed, either Severity or Probability.


Severity indicates how quickly ice is likely to accumulate on your airplane, while probability displays the likelihood that any type of icing threat will exist in that area. A forecast of a high probability of a trace of icing requires a completely different approach than a 25% chance of severe icing with supercooled large droplets present.

2) Set personal pilot weather minimums
There’s a safeguard in Garmin Pilot that will get your attention when planning a flight if the forecast ceiling height, visibility or wind speed exceeds your personal limits. To enable this feature, head over to the main Settings screen, select Pilot Info from the left-hand menu and select your name from the list of Pilot Profiles (or add a new Pilot Profile if you haven’t already). There you’ll find three options under Personal Minimums for VFR, IFR, and Winds, where you can specify your minimum ceiling, visibility, wind speed and gust factor for the departure and destination airport enterted in your flight plan.
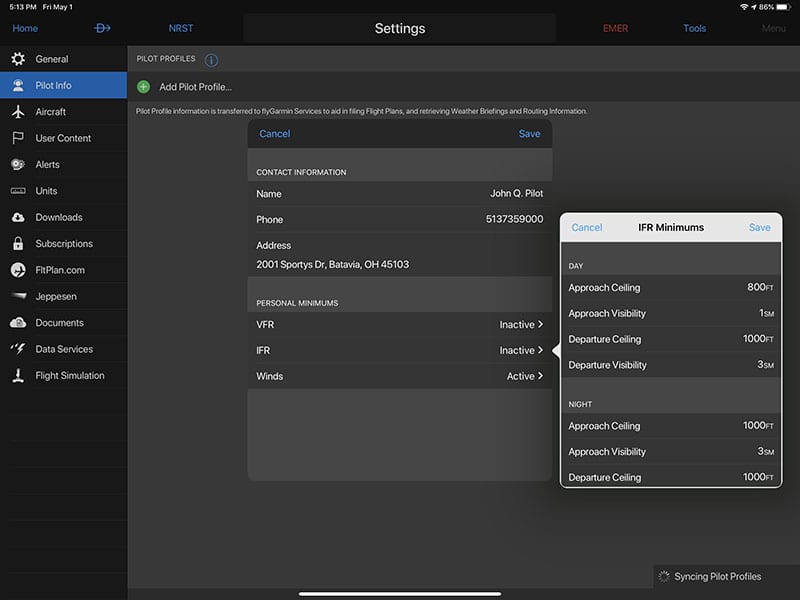
Then, when on the Trip Planning screen, if the TAF calls for a condition outside your set minimums, a yellow alert triangle will be displayed by the airport ID with a message explaining the condition.

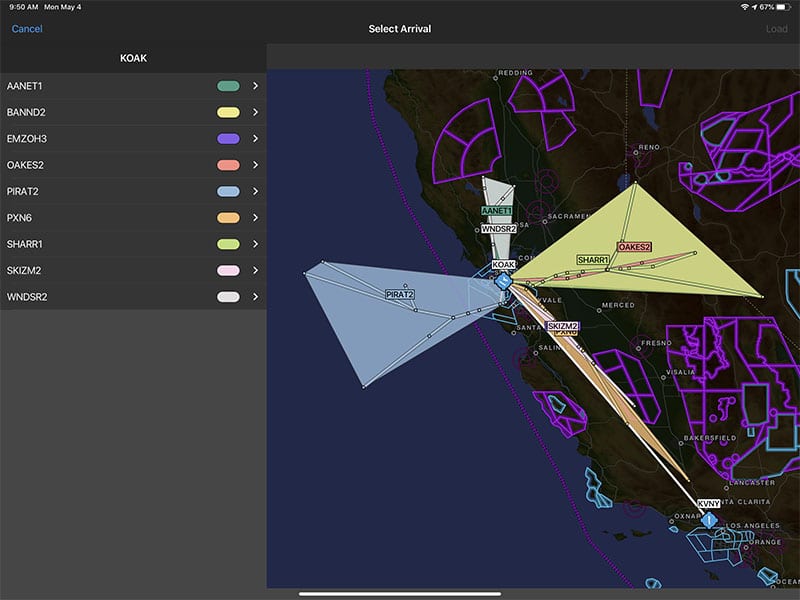
3) Use the Procedure tool to find the perfect arrival
You know you’ll have to fly an arrival at a busy airport like OAK, but how do you pick between the SHARR1 and the SKIZM2? Garmin Pilot’s new visual Procedure tool makes it easy. From your active flight plan (on the Map page, for example) tap on the PROC button next to your destination airport. From there, tap Select Arrival, then Select On Map. This will bring up a color-coded map with each of the available STARs. Tap on the one that fits your route, then select the transition and runway (if applicable). The final step is to tap Load at the top right corner. Now you’re ready to fly each leg of the STAR, without typing in a bunch of intersections.
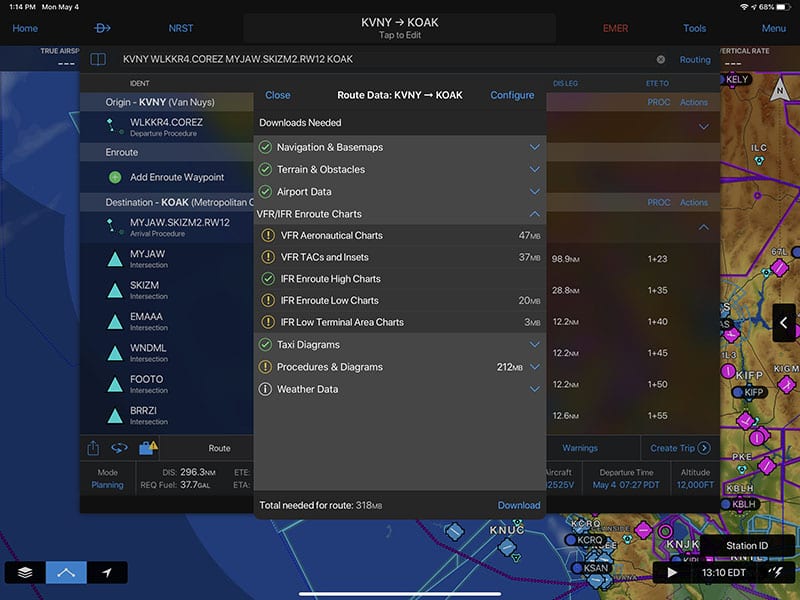
4) Download all required route data with one tap
The perfect flight plan is useless if you forget to bring along all the necessary charts and databases. Fortunately, Garmin Pilot now makes it easy to check your download status. From the active flight plan page, tap the suitcase icon at the bottom left (you’ll notice a yellow ! if you need to download new data). This will show you all the data required for your flight, from airport maps to sectionals to weather data. You can configure which items should be downloaded by tapping Configure at the top right. If you’re ready to update, just tap download and the app will save everything it needs so it can be accessed in flight without an internet connection.
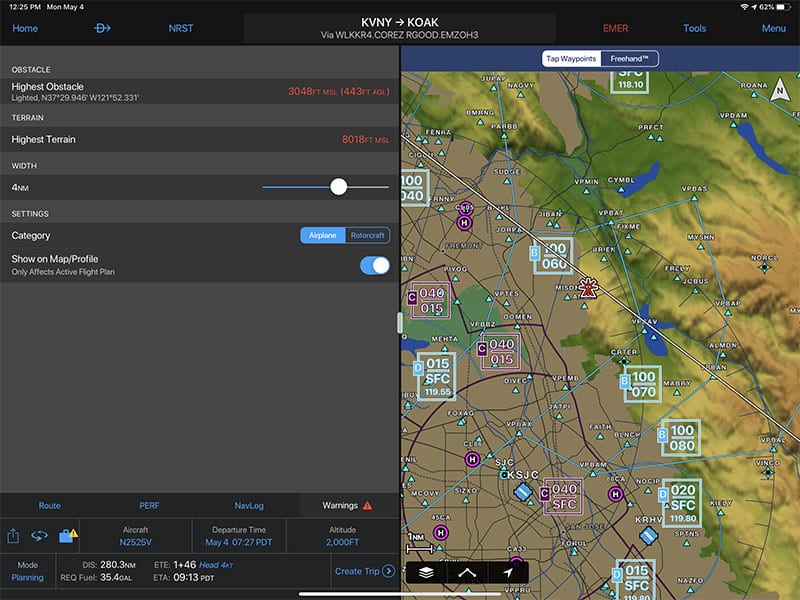
5) Minimum altitude warning
When in the Flight Plan section of the app, Garmin Pilot provides a subtle alert if your planned altitude doesn’t provide enough clearance above the highest terrain feature or obstacle along your route. When a conflict is detected, you’ll notice a red triangle next to Warnings at the bottom of your flight plan screen. Tap on that for details about the warning, and select “Show on Map/Profile” to see the highest obstacle and terrain. This is especially helpful for helicopter pilots.
What’s your favorite Garmin Pilot planning tip? Add a comment below.
- Garmin introduces D2 Mach 2 Pro smartwatch with LTE, Iridium - April 24, 2026
- SkyDemon offers simple, VFR-only app experience—is it enough for US pilots? - March 24, 2026
- How to Improve Your iPad’s Battery Life - February 19, 2026

