Flying with ADS-B receivers – a real world scenario
Modern ADS-B receivers like the Stratus 2S or Garmin GDL 39 3D have grown far beyond their initial role as just in-flight weather provider. With features like traffic, flight data recording and synthetic vision, they are more like all-in-one iPad sensor packages. With all that capability comes some confusion, though – what’s the right way to fly with one of these? How do you get the most out of your investment?
Here’s a look at how we might fly a typical flight with an ADS-B receiver to take advantage of all its safety features.
Pre-flight
Just like your airplane and you, the pilot, it’s smart to do a quick pre-flight inspection on your ADS-B receiver. The obvious step is to make sure the battery is charged (if it has a battery), since that’s the most likely reason for it to quit. Beyond that, make sure you have a backup power plan, whether it’s a cigarette lighter charger or a battery pack. Also make sure you have the right mounting system with you, like a suction cup. Finally, it’s smart to (at least occasionally) check the firmware on your receiver. From time to time, updates are available that enhance performance or fix bugs – make sure you do those updates.

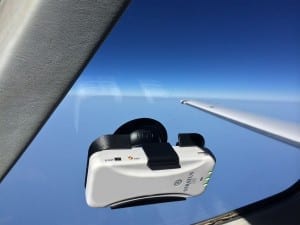
A side window is a great spot to mount an ADS-B receiver–just make sure to secure it in place first before turning it on to ensure proper AHRS calibration.
Once you’re in the airplane, there isn’t much to do besides turn your ADS-B receiver on. But there’s one important tip here: if your receiver has an AHRS in it, make sure you mount it first, then turn it on. As soon as you turn it on, the system will try to calibrate, and if you’re moving it around trying to mount it while it’s calibrating, you may not like the attitude picture you get. As far as mounting location, we like a suction cup mount on the side window best, but take the time to find the right answer for your particular airplane.
Once the ADS-B receiver is mounted, and turned on, verify it is connected to your iPad and visible in the app. Start up ForeFlight or Garmin Pilot and find the Devices page. Make sure the app recognizes the ADS-B receiver and all indications look normal. If it’s not there, check your iPad’s Settings app to verify Bluetooth/WiFi is on and make sure your iPad app is up to date.
Takeoff

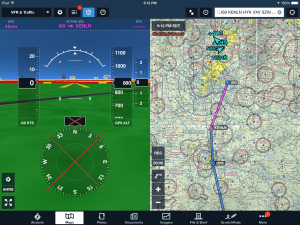
You’ll find it helpful to turn on synthetic vision for takeoff to provide terrain and obstacle avoidance information.
Before takeoff, make sure your iPad app shows a GPS lock and your position is showing on the moving map. If it’s not, tap the button to center the map on your airplane (this is the little crosshair symbol in ForeFlight).
If you have synthetic vision enabled, it’s a good idea to turn on SV before takeoff – terrain and obstacles are a concern at low altitude so this is a time to use all the information you can get. Also be sure to turn on the traffic layer, since the airport environment is where most close calls happen. This layer isn’t on by default, and in ForeFlight it’s not even visible unless you’re connected to Stratus, so make sure it’s selected before you leave the chocks.
Some pilots go so far as to turn all weather layers off at this point. After all, you won’t get reception on the ground in most cases, and it may cut down on the clutter. Even if you don’t go this far, it may be wise to declutter a few things on the map.
Cruise
Once you’re above approximately 2000 ft. AGL, the synthetic vision display may be less useful so it’s a good time to switch to the main moving map view. Also check that your desired weather layers are turn on, like radar, TFRs, PIREPs and text weather reports. In particular, we like the Flight Category option. Whereas the Ceiling layer only shows a number if there is a broken or overcast layer, Flight Category shows up for every airport. It’s a great way to get a good at-a-glance look at weather conditions – green is good.
En route, be sure to check the timestamp periodically. You should be receiving new weather every 5-10 minutes, so if you ever see 30 minutes or more pass, it’s time to investigate. The first place to look if you suspect a problem is the status page in your app. All apps have a page that shows your ADS-B receiver’s overall status, like the number of ADS-B towers being received, battery life and age of weather. Make sure you know how to find this information, and review that page occasionally.

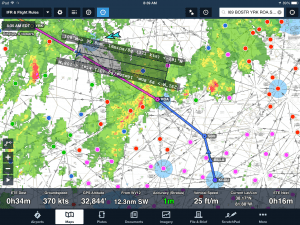
The ruler tool is very useful when a deviation around weather is necessary, to plan both a new heading for how many miles you’ll need to go off course.
If weather en route requires a deviation two features can make it much easier: the ruler and rubber band flight planning. The ruler allows you to measure the distance between any two points on the map, and calculates the time en route between those points. This is helpful for considering how long your deviation might be. Rubber band flight planning makes it easy to plan deviations well in advance – instead of asking for “20 degrees right,” just drag your route until it’s clear of the bad weather.
Approach and landing
When it’s time for approach and landing, the procedure is much like the takeoff sequence in reverse. Turn on SV to keep an eye on towers, especially if you’re in IFR conditions. We’ve found SV is also very useful for finding the airport, whether it’s VFR or IFR.
If the weather requires you to fly an instrument approach, make sure to display the approach chart on the moving map. This will allow you to view weather and traffic layers right on top of your instrument approach chart.
Post-flight
After landing, there’s not much to do other than turn off your ADS-B receiver and store it. But if you’re using a Stratus 2 or 2S, be sure to make use of the flight data recorder feature, where Stratus continually logs GPS position and attitude during flight. After you land, go to the Stratus Status menu and transfer the log from your Stratus to ForeFlight. From there, it’s easy to debrief your flight online or in a third party app like CloudAhoy or Google Earth. This also makes it easy to fill out your logbook.
Your tips
There are certainly more ways pilots can use an ADS-B receiver, but this approach at least considers what information is most important at each point throughout a flight. Any tips you would add? Share a comment below.
- Do I really need to use Airplane Mode on my iPad or iPhone Pilot? - December 31, 2025
- Flying with the Garmin D2 Mach 2 and D2 Air X15 - October 28, 2025
- Weather planning with Garmin Pilot: widgets and flight profile - October 22, 2025


for 3G/LTE non Wifi-only iPads (iPhones) you’ll want to be make sure to brief, file & activate (VFR) your flight plan BEFORE connecting to the Stratus Wifi
and then after landing, engine off; disable Wifi & CLOSE your (VFR) flight plan
Rusty, was wondering if this is why I have a problem filing a flight plan while in the air? Obviously I have the Stratus running while trying yo do this.
Any plans to make this available for Android?
Excellent reminder article! The article’s statement that “Flight Category” shows up for every airport isn’t quite correct. But check me out on it? It shows up for all towered airports, and some non-towered airports. Probably depends on how sophisticated the AWOS is in transmitting its information.
It should show up for any airport that’s reporting weather via the ADS-B system.
Thanks for the immediate reply, John! Yeah, I should have realized that since this was an ADS-B article, that it was referring to any airport that’s reporting weather via the ADS-B system. Sorry for the oversight.
Excellent article.
Recommendation – do not attach the Stratus & suction cup to a window which opens!
OK, Gary, admit it to the world: Did you lose one that way?!?