
Getting started with Sentry: models, mounting, and setup
|
Getting your Trinity Audio player ready...
|
An ADS-B receiver is an essential tool for any pilot flying with an iPad. These portable devices deliver critical information to your favorite app, including datalink weather, nearby traffic, and GPS position, and with no monthly subscription required they are a great value. The Sentry family, from ForeFlight and uAvionix, is the best-selling option right now, with three models to suit different needs and budgets. Here’s what each model can do and how to get started flying with Sentry.
Choosing the right model
ForeFlight currently offers three Sentry models: Sentry Mini, Sentry, and Sentry Plus. All three offer the features that matter most: weather, traffic, and GPS. The differences mostly relate to higher end features like backup attitude and carbon monoxide detectors, or battery life. Here’s a side-by-side comparison:

The Sentry Mini is the best answer for a VFR-only pilot who wants in-flight weather without breaking the bank. You’ll need to plug it into a cigarette lighter or a battery pack, but you’ll enjoy all the weather and traffic features in flight—a huge safety upgrade. Stepping up you’ll find the original Sentry, which at just $599 is a great value. While it lacks some of the higher end features and performance of the newest model, it does include an AHRS to drive synthetic vision and a carbon monoxide detector, all while maintaining a very small size. Sentry Plus is the latest and greatest model, packed with every feature you could want, including a G-meter and an automatic flight data recorder, plus an unmatched 18-hour battery life. All three models are designed to work exclusively with ForeFlight.
Quick start guide
Flying with a Sentry is easy. Just charge it up, mount it in the airplane, and connect it to your iPad. Here are more details on these steps.
Charge it. Sentry Mini requires full-time power, so a cigarette lighter plug or a backup battery is a must-have. Even with Sentry and Sentry Plus, which both have long battery lives, a backup power source is a good idea. Be sure to use a 2-amp charging plug and the original Sentry cable for best results. The Sentry Plus can accommodate quick charge and power delivery plugs, but the older Sentry model cannot. A full charge will take 10-12 hours, and the blue charging light will go out when the battery is full. When in doubt, your iPad’s wall plug is a good option. Also note that you can charge and operate Sentry at the same time, so in-flight charging is not a problem.
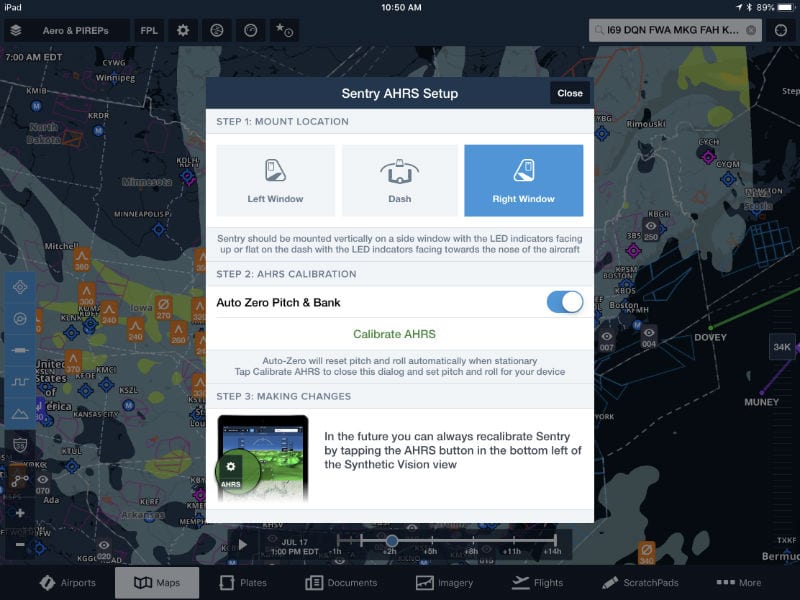
Mount it. Sentry is designed to be mounted on a side window, using the included suction cup mount. This location maximizes GPS reception, ADS-B reception, and cooling airflow. Note that the Sentry can be mounted on either the pilot or co-pilot window, and even the dash is an option (although not as good for reception and heat). It does not have to be perfectly level, since the AHRS can be calibrated in ForeFlight, but it should be stable. If you want to use another mounting solution, you can remove the small mount adapter on the back of Sentry using a 4mm hex key. This will reveal a standard ¼”-20 bolt (like a camera tripod), which can be used with a wide variety of mounts. Wherever you mount Sentry, be sure to update the location in ForeFlight (see below).
Connect it. Connecting Sentry to your iPad is easy: just turn it on by pushing the power button, then go to the Settings app on your iPad and tap on Wi-Fi. From here you can choose the Sentry Wi-Fi network to establish a connection (there is no password required). You can verify a successful connection by opening ForeFlight and going to the More -> Devices page.
Adjust settings. Other than telling ForeFlight where the Sentry is mounted, there are no settings to adjust in normal operations. Once you’re in range of an ADS-B ground station (usually about 500-1000 ft. AGL), you’ll receive weather—just be sure to select the Radar (ADS-B) map layer if it does not come on automatically. If you need to check device status or change any settings, go back to the Devices page or tap the gear symbol at the top left of the Maps page and choose Sentry. From here you can adjust LED brightness, test the CO alarm, or change the Wi-Fi network settings.
Videos
Want to learn more about Sentry? Check out our video series that dives into the details of these capable ADS-B receivers.
How to use ADS-B traffic when flying with a Sentry receiver:
How to use the AHRS, CO monitor, and flight data recorder on Sentry Plus:
Flying with datalink weather (webinar recording):
Sentry Plus product PIREP video:
Understanding ADS-B traffic >>
- Garmin introduces D2 Mach 2 Pro smartwatch with LTE, Iridium - April 24, 2026
- SkyDemon offers simple, VFR-only app experience—is it enough for US pilots? - March 24, 2026
- How to Improve Your iPad’s Battery Life - February 19, 2026

